Setting Up the Supabase Admin Dashboard
Overview
StartupBolt includes a built-in admin dashboard. To access it, you need to ensure that at least one user has the admin role assigned in the Supabase authentication database. This guide walks you through the steps required to enable and access the admin dashboard.
Prerequisites
Before proceeding, make sure you have completed the authentication setup in Supabase. If you need help setting up Google OAuth or Magic Link authentication, refer to the respective guides:
Magic Links provide a passwordless login experience by sending a secure login link to the user's email. The guide also covers setting up a custom SMTP provider like Resend (opens in a new tab).
Create a User with Admin Role
This section is required only if you followed the Manual Setup Guide. If you used the Automatic Setup, you can skip this part as a default admin user is already created.
Note: Refer to the Manual Setup Guide or Automatic Setup Guide if you’re unsure which setup you followed.
1. Sign Up to Create a User
If you have already completed the authentication setup, you can sign in using Google OAuth or Magic Link.
Navigate to the Login Page (/login) and sign in.
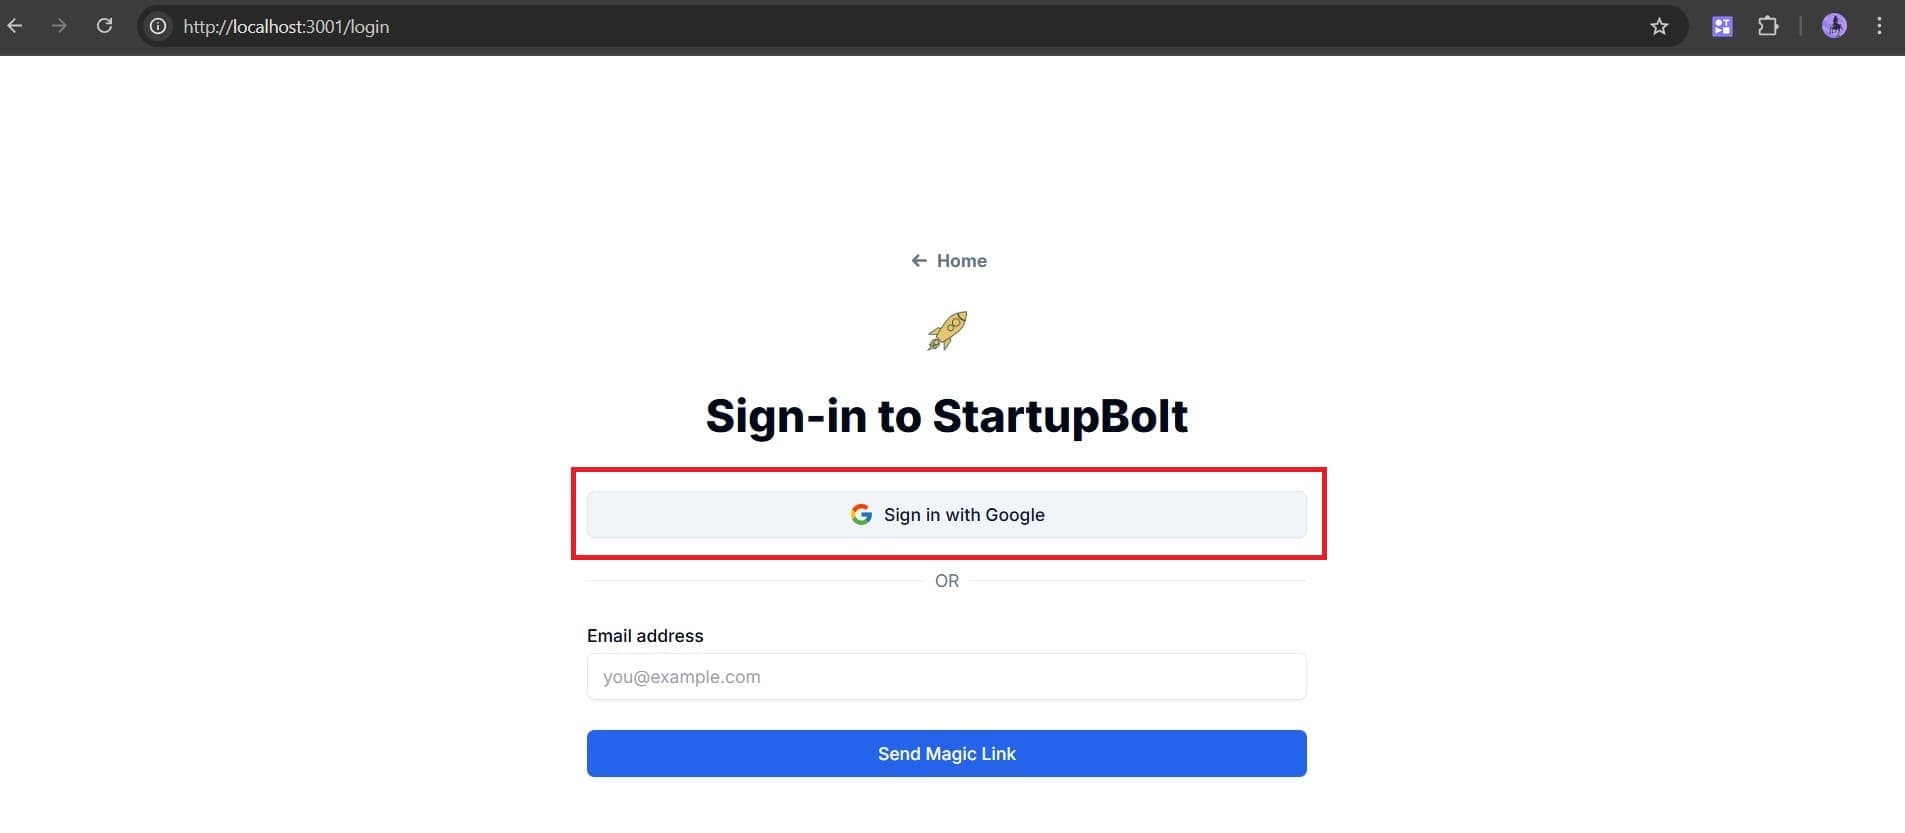
This will create a user in the auth.users table.
2. Assign Admin Role to Your User
- Log in to Supabase (opens in a new tab).
- Navigate to Supabase > Table Editor
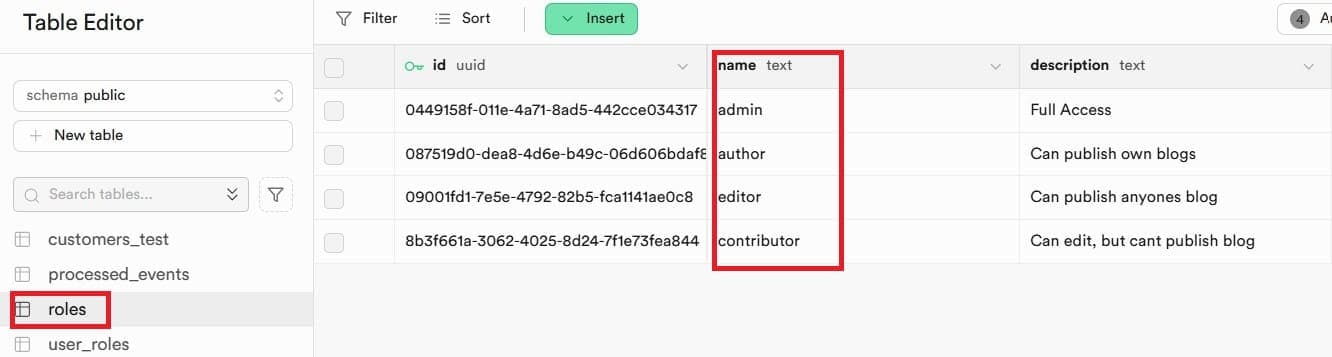
a. Open the roles Table
- In Supabase, navigate to the roles table.
- You will see predefined roles (including "admin"). These were created as part of the Supabase Roles Guide.
b. Assign the Admin Role to Your User
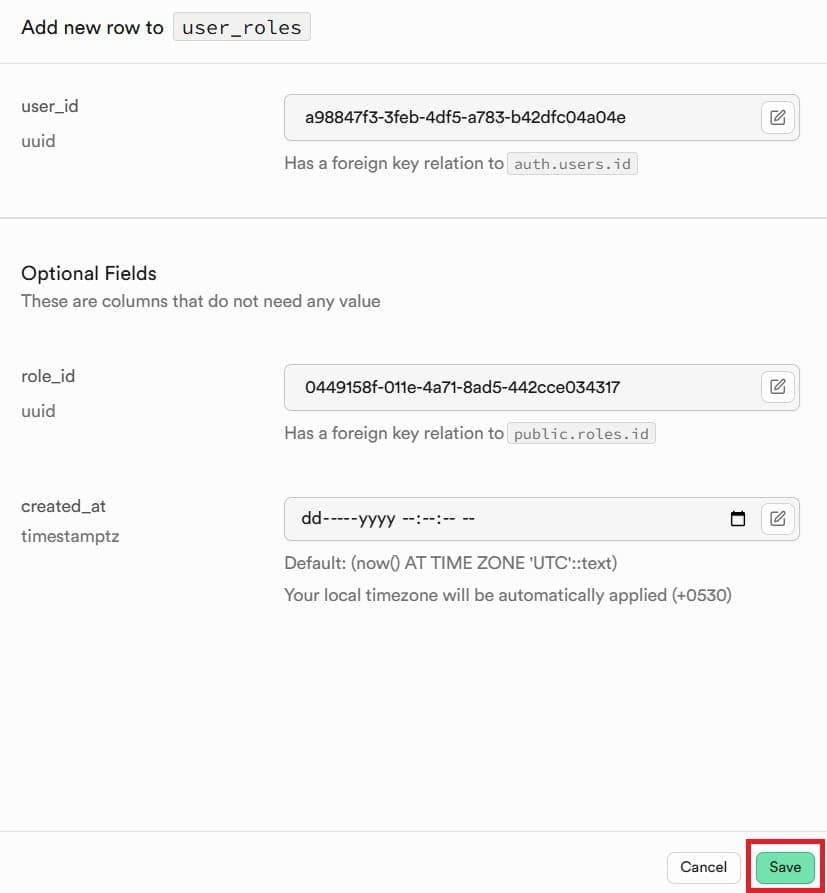
- Open the user_roles table.
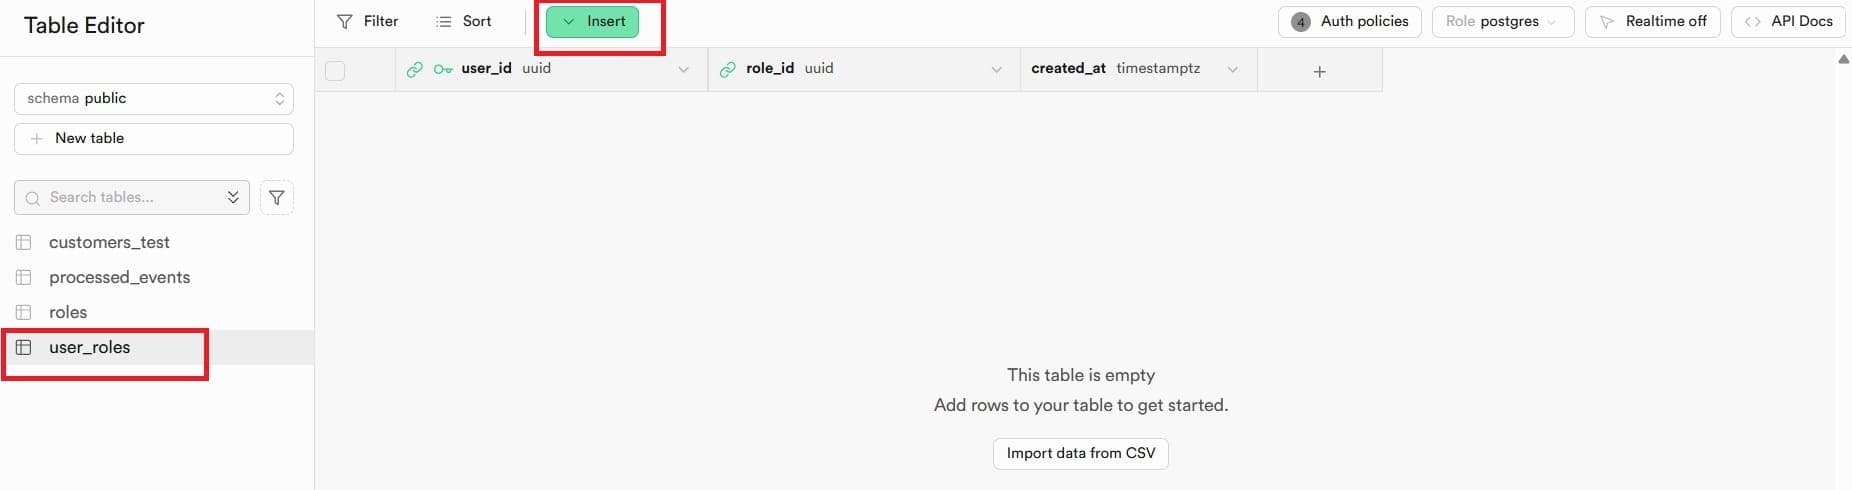
- Click Insert Row to create a new entry.
- In the
user_idfield, select the user you created earlier.

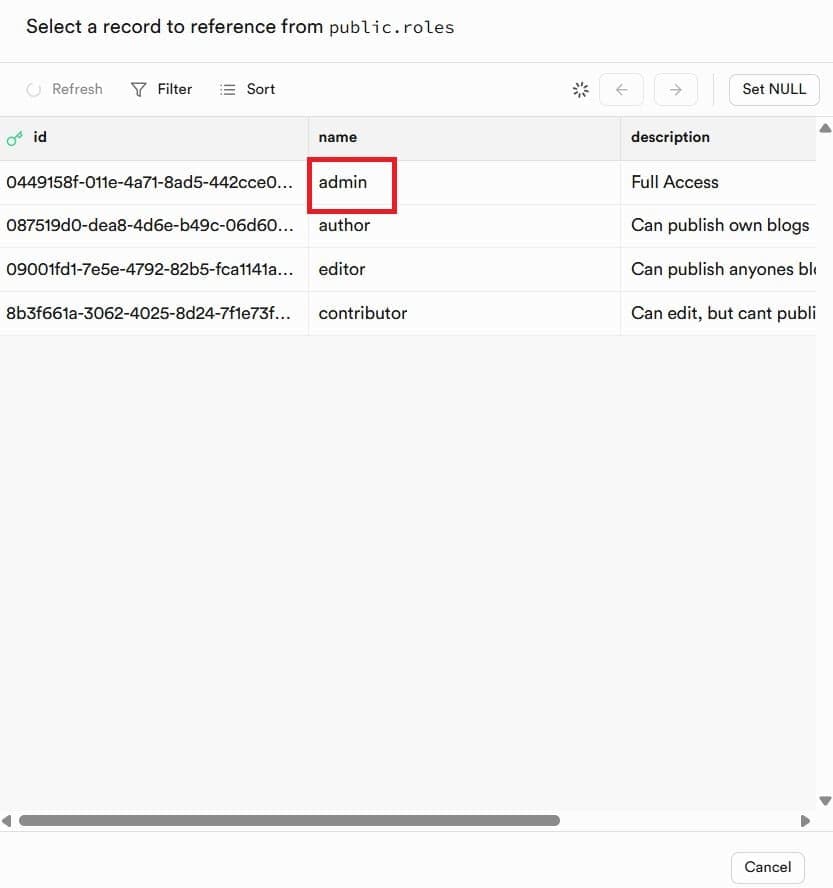
- In the
role_idfield, select admin.
- Click Save to apply the changes.
Now you will see a new row in the user_roles table with the user you created earlier and the role as admin.
Accessing the Admin Dashboard
You can access the admin dashboard in two ways:
a. Through the Login Flow
- Go to the Login Page (
/login) and sign in with the user you created earlier. - Once logged in, you will be redirected to the private page (
/private). - Click on the Dropdown Menu in the top-right corner and select Admin Console.
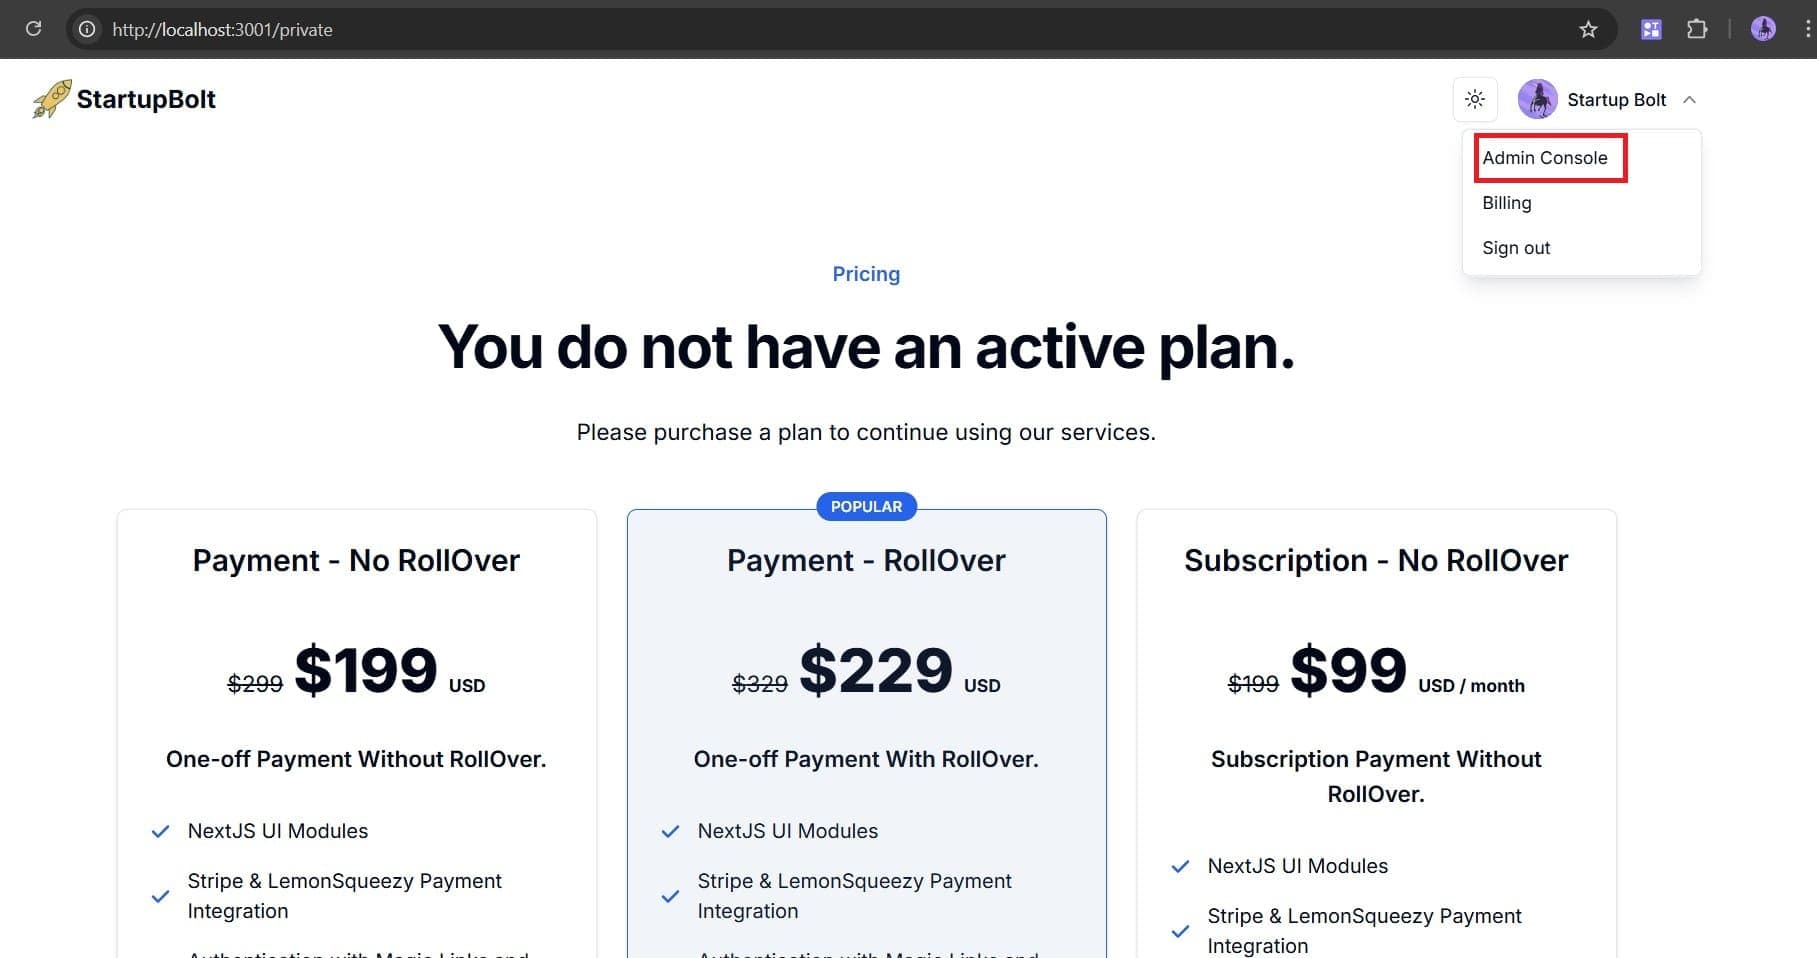
This will take you to the admin dashboard at /admin.
b. Direct URL Access
Open your browser and navigate to /admin.
- Local developmentt:
http://localhost:3000/admin - Production:
https://your-website-url/admin
If your logged-in user has the admin role, the dashboard will load successfully.
Admin Dashboard Interface
Note: The admin dashboard is fully accessible only to users with the
adminrole. Users with other roles — such aseditor,author, orcontributor— will have limited access and fewer privileges.
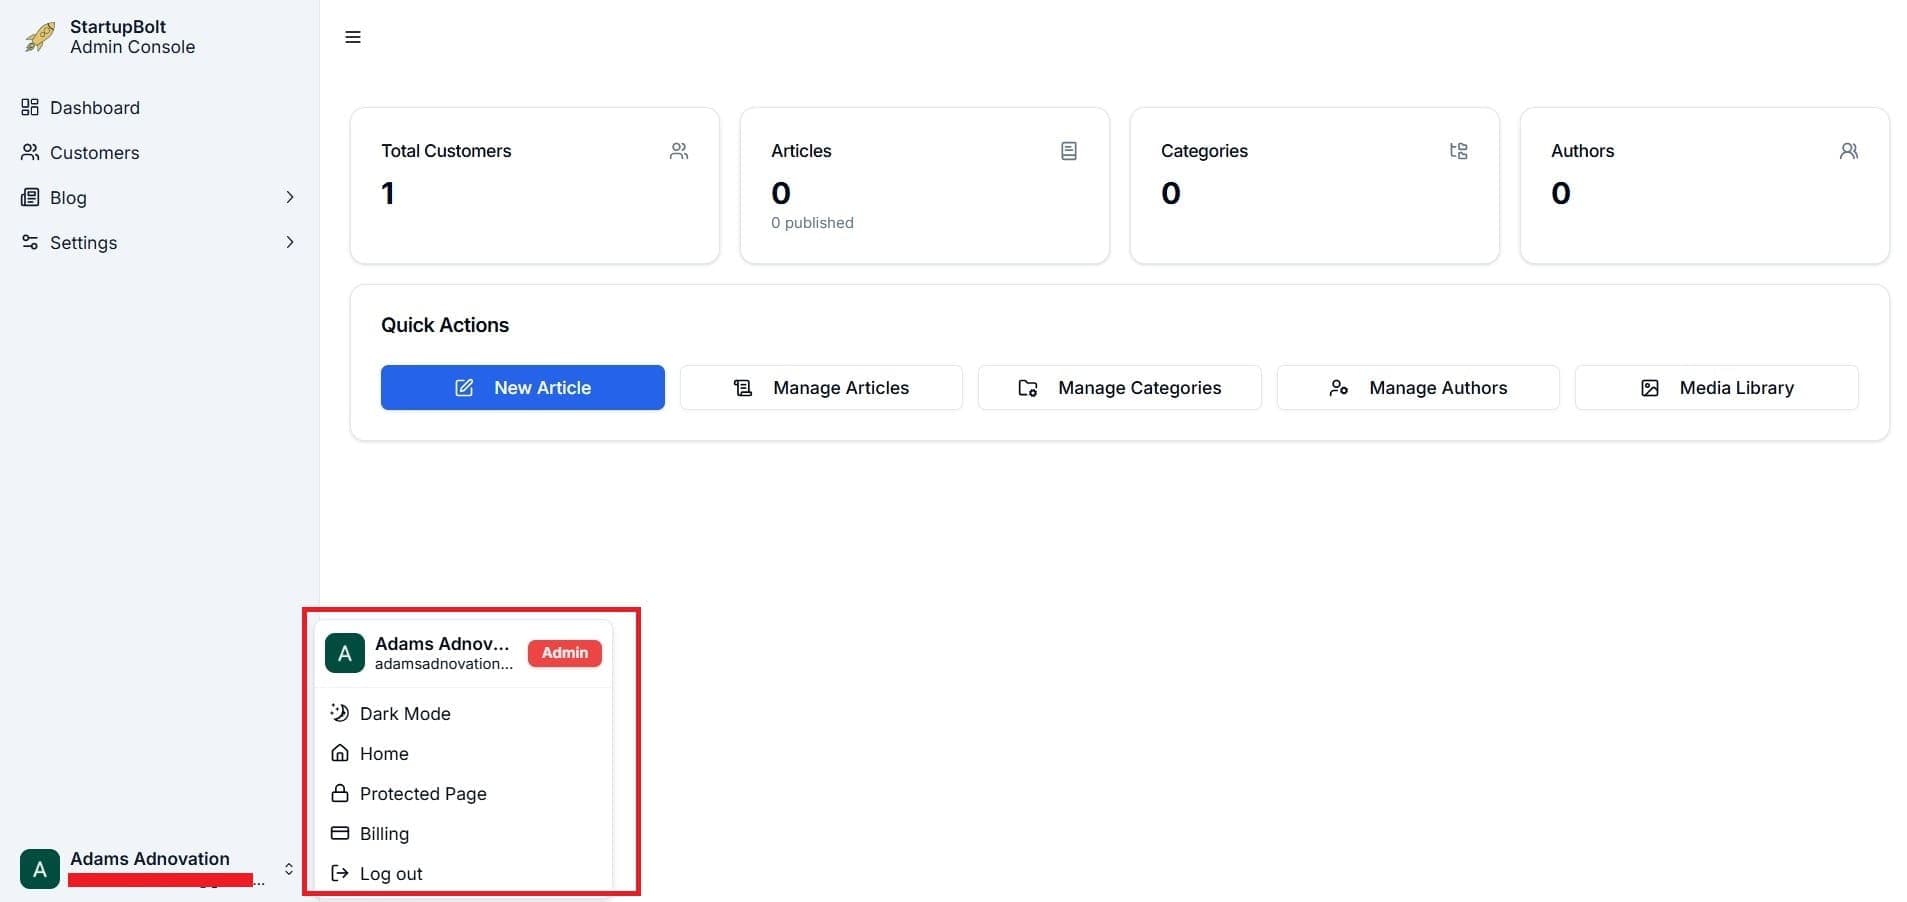
1. Sidebar
The sidebar is fully mobile-responsive. As an admin, you will see the following menu items:
- Dashboard
- Customers
- Blog
- Settings
At the bottom left corner, your name and avatar will be displayed. Clicking on it opens a popup menu with the following options:
- Role Tag: Displays your role (Admin, Editor, Author, or Contributor) with different colored tags.
- Dark Mode: Toggle dark mode on or off (only available if enabled in settings). Refer to the Dark Mode Guide for more details.
- Home: Redirects to the home page.
- Protected Page: Redirects to the protected page. Refer to the Protected Page Guide for more details.
- Billing: Redirects to the billing page.
- Logout: Logs you out of the application.
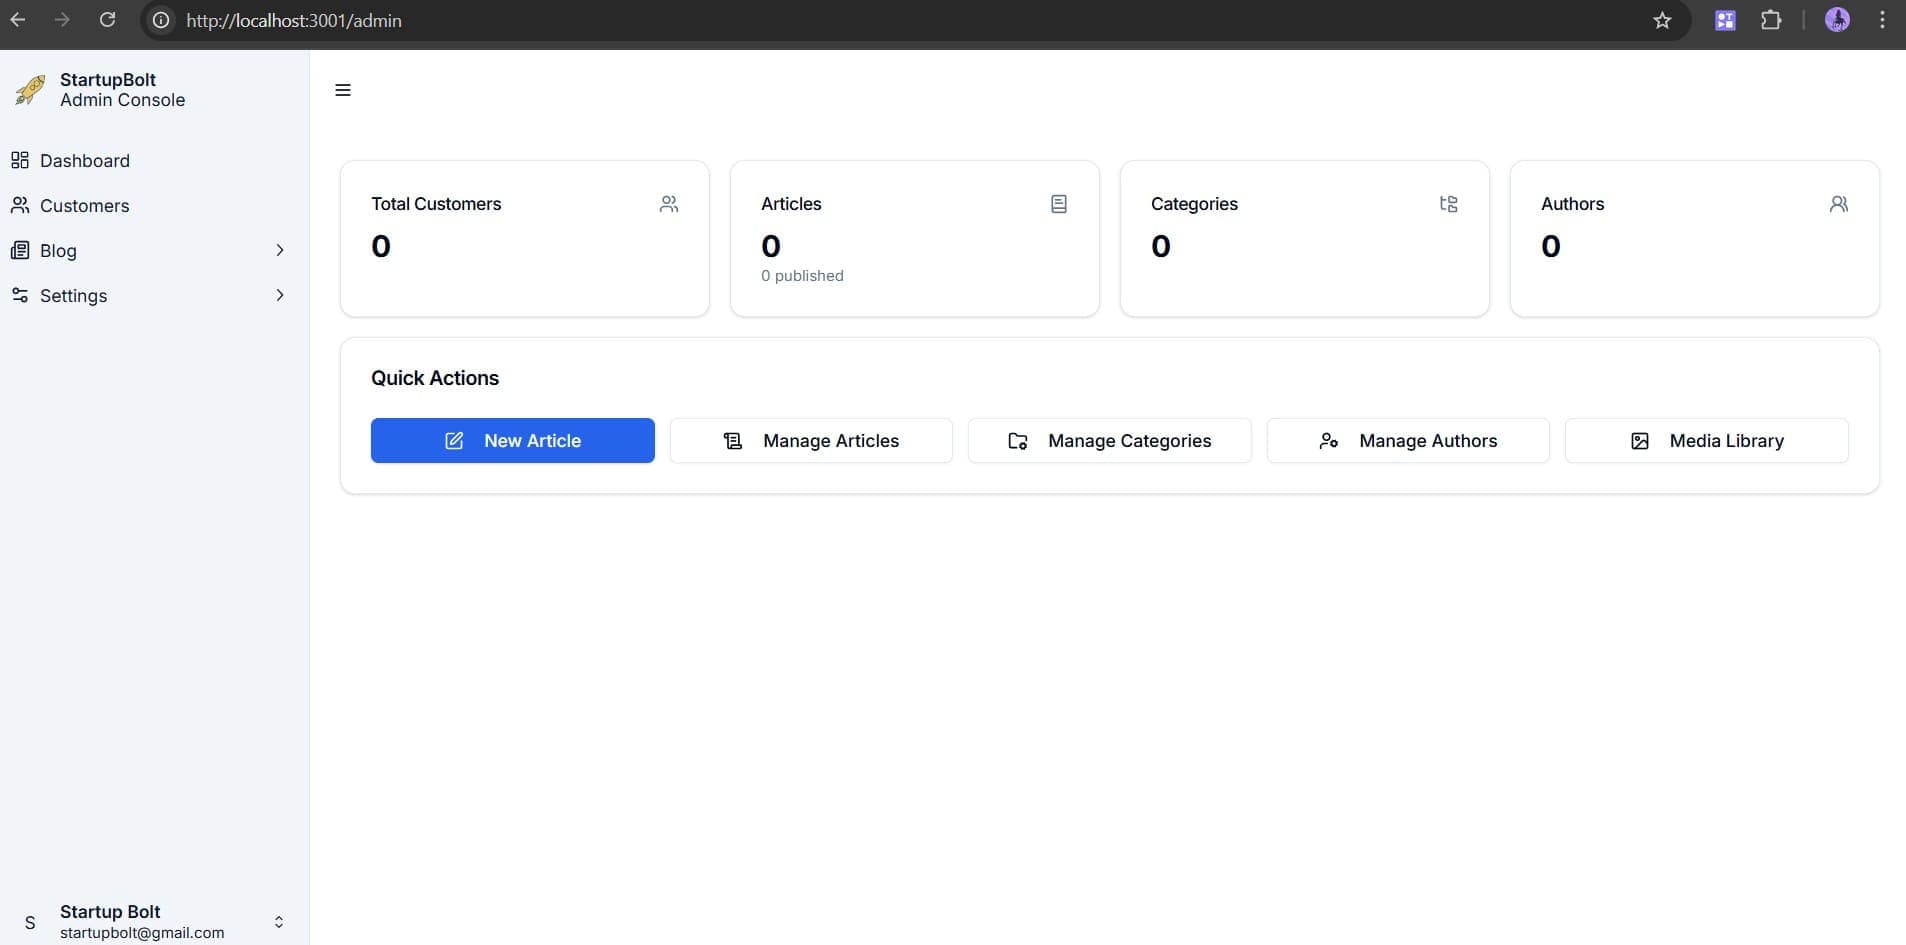
2. Dashboard
The dashboard provides an overview with key metrics:
- Total Customers
- Total Articles
- Total Categories
- Total Authors
Additionally, it includes quick action buttons for:
- Creating new articles
- Managing articles, categories, authors, and media

3. Customers
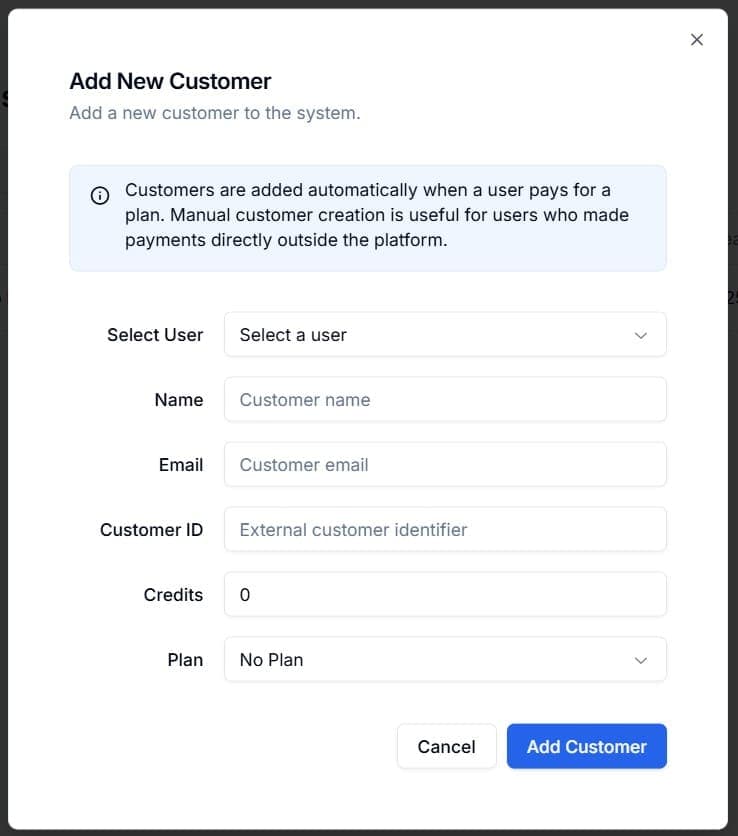
The Customers page lists all users who have purchased a plan. Clicking the Add Customer button allows you to manually add a new customer. Customers are typically added automatically when a payment is processed. However, manual addition is useful for customers who made payments outside the platform.
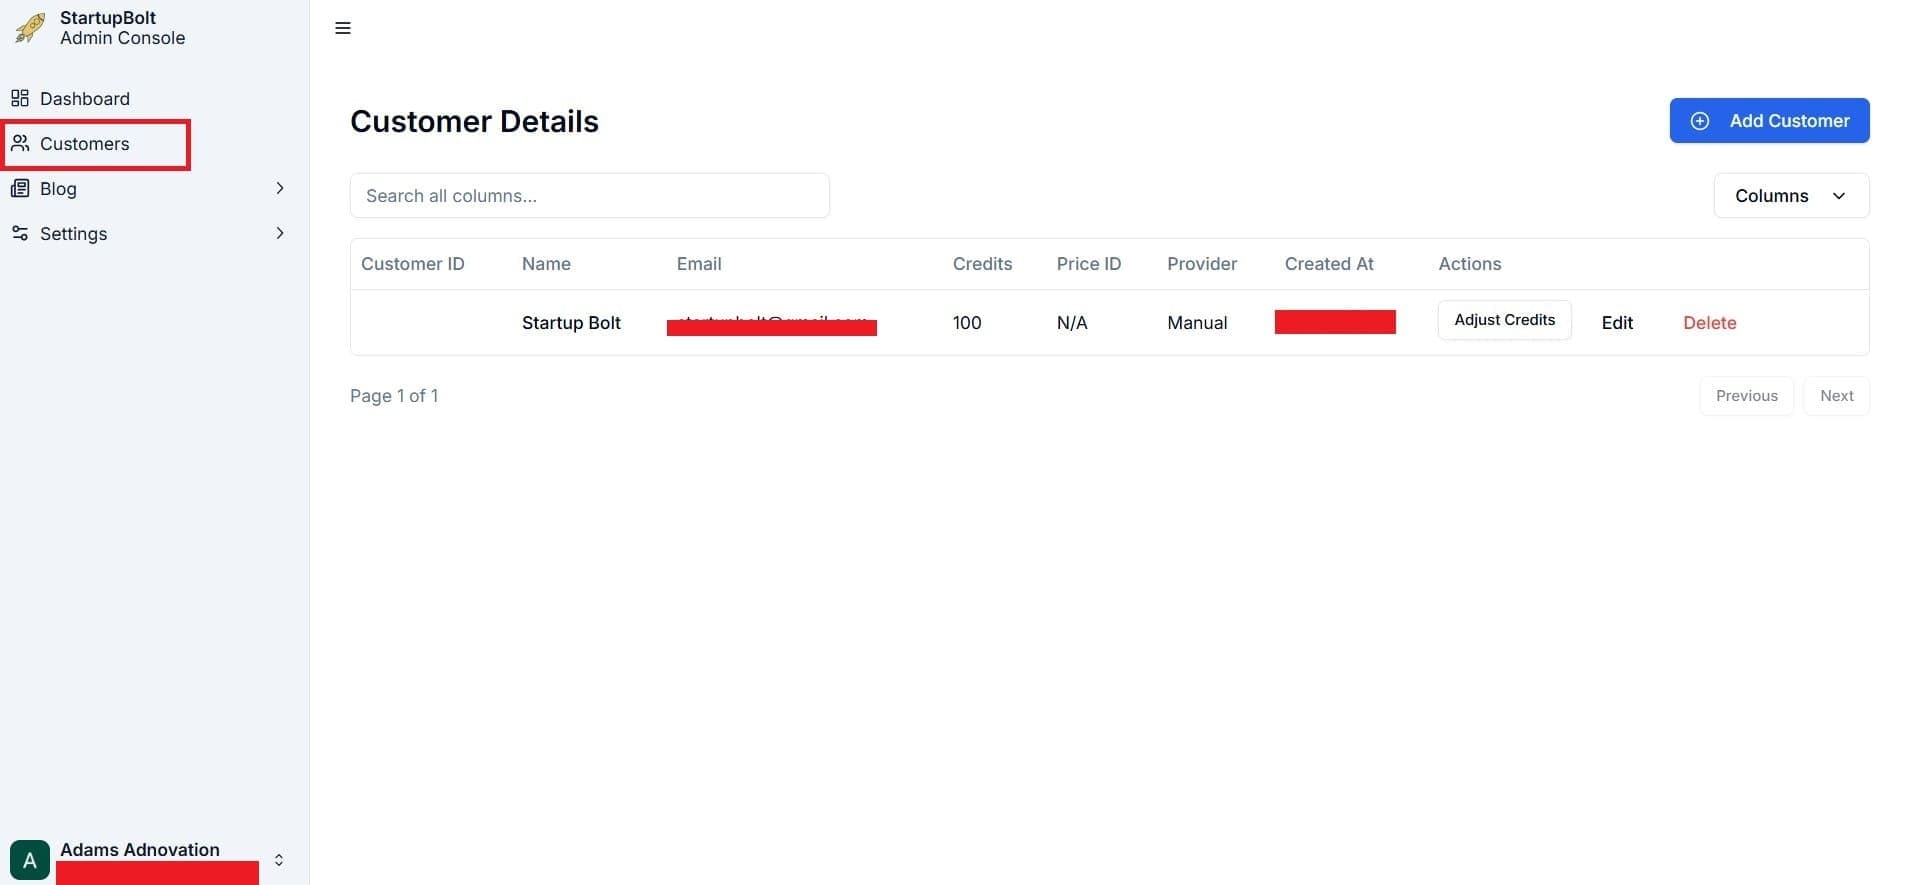
Adding a Customer
To manually add a customer:
- Ensure the customer is a registered user.
- If they are already signed in to your application, they will appear in the user dropdown.
- If they are not a user, first create one under Settings > User Management.
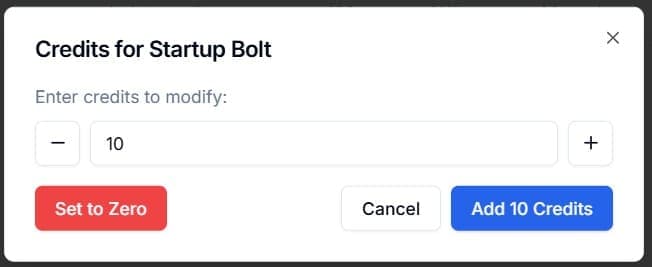
Adjusting Customer Credits
You can modify a customer's credits as needed.
Editing and Deleting Customers
- You can change plans for manually added customers.
- For automatically added customers (via Stripe or LemonSqueezy), plan modifications must be handled in the respective payment provider.
- Be cautious when manually editing customers if automatic creation and credit adjustments via webhooks are enabled.
4. Blog
Refer to the Blog Dashboard for detailed instructions on managing your blog.
5. Settings
User Management
The User Management section allows you to:
- Assign and change user roles (Admin, Editor, Author, or Contributor)
- View all signed-in users (stored in
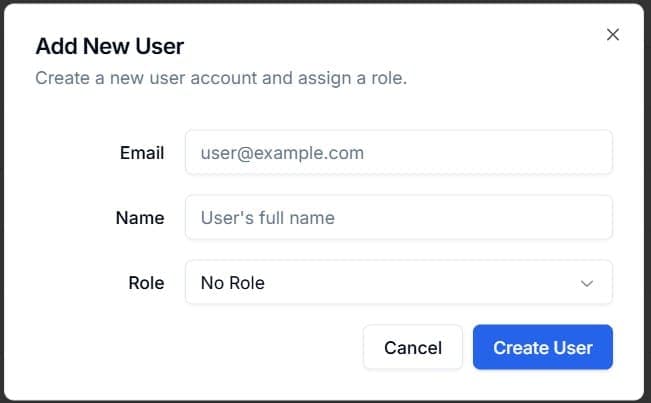
supabase.auth.users) - Manually add new users by entering their email, name, and role

To add a new user:
- Click Add User.
- Enter the required details (email, name, role).
- Click Create User to add the user.
Note: Changing a user's role will affect their access level in the admin dashboard. Only Admins can access the Customers and User Management sections.
Final Remarks
Congratulations! You have successfully set up and accessed the StartupBolt Admin Dashboard. You can now manage your platform efficiently with admin privileges.